Friday 28 September 2012

Vintage Rose Anniversary Cake


One day, I got a message from Angela's friend to do a cake for him. If you remember I did wedding cake for Angela and apparently it was a hit as her friend now wants me to do a cake for his anniversary. The brief was quite simple he wanted a rose cake and send me a picture of a cake he wants. The colors are so vibrant and exciting something that I might not pull it out of my brain but all in all it looks lovely.

First thing I did was creating the roses, am so lucky that I got this project so I can keep practicing my sugar flowers technique. I did like 8 roses and I thought that I've made more than enough, boy I was wrong it's just enough no spare flowers.


Roses and leafs resting and seting

The cake was 2 tiers white chocolate mud cake, never done white chocolate mud but thanks to my generous friend Tina who shared her recipe. Naturally I filled white chocolate mud cake with white chocolate ganache and covered with white chocolate ganache before fondant.

Cakes covered in white chocolate ganache

It's been always a mystery to me how other cake artist can achieve sharp edges on their cakes, especially Australian. I've seen dozen of video on Youtube and so many tutorial on how to get the sharp edges but nothing really works for me. So, on day I found a side smoother from Little Venice Cake Company with straight edge and it hit me that this tool might be useful to get straight edges, boy I was wrong. The tool was great but because of the straight edge I teared my fondant, but using this cake give me confident to try the technique with normal smoother and it works.

The secret of sharp edges is using 2 fondant smoothers and sort of like push the fondant from the top and side of the cake together, sort of like pinching them to achieve sharp edge. It's not an easy technique because it takes a lot of courage to pinch the fondant and takes a lot of time because you don't want to rush it or you can end up with teared fondant. All in all, I'm really happy with the result on this cake, I can say this is my first sharp edge cake first of many to come.

Sharp edge cake finally

So the cake was done and stacked together, I've done the pipping work and it was time to place the roses on top of the cake. This is something new to me and I'm not 100% confident in doing this. So I use straw to wrap the stems of the roses as I don't want the flower tape touching the cake directly and I tried the best that I could to arrange the flowers, the result wasn't too bad but I would love to have more leaves.

My flower arrangement

One of the request is putting their names together as this is their anniversary. First I was thinking to just easily slap it on the cake board, simple and easy. But the cake turned out so good so I'm not willing to let it go easy way. To match the theme I did a vintage frame on the bottom tier so their name can go inside the frame and look better.

Names on bottom tier

This project took longer than I thought, such a simple design but the sugar flowers are so labor intensive, but I really enjoyed doing this cake and love how it turned out. Thanks for checking my blog, will update you with my next project.

Another view of the cake

Saturday 22 September 2012

Bakerz Mum's Birthday Cake - 2012

Special Bakerz Mum logo on her 30th birthday

If you guys have been following my blog since last year, you might recall that one of the first cakes I made was for Bakerz Mum's birthday. It was a small cake and only to feed small number of people. I did some roses and did some pipping. Here's the cake to refresh the memory.....how time flies and you can see how much I learned in a year.

Bakerz Mum's Birthday Cake - 2011

As a very modest person of course Bakerz Mum never thought about her birthday, her only request is a nice family dinner just the 3 of us. However, her birthday happened to be fall on the same day as our prayer group meeting and we can't bail on this as we had several of our regular members on holiday. So I propose to her to make her a proper cake so we can celebrate her birthday on the meeting and she reluctantly accepted.

When I asked her what kind of birthday cake she had in mind as usual she replied that she had no idea. So I came out with 2 tiered cakes with some sugar flowers on it. It happened that a week before her birthday I received an email that Craftsy.com is having a 50% off sale on their online classes so  splurged and one of the classes is Handcrafted Sugar Flowers by Jacqueline Butler of The Petal Sweet. So I did some sugar flowers using the technique I learned from the online class and created 2 peonies, 2 roses, 1 rose bud, 20 hydrangeas, and 20 hydrangeas buds.


What I had in mind is creating an arrangement on the cake...oh how I can be so wrong. I was out on a business trip to Tasmania for 3 days so I have to rush the cake on Friday night. It wasn't the most perfect cake, had some problem with the ganache etc since we're our own customer this time I'm not really fuzz about things.


I iced the cake and stack them together, if you look closely you can see how these two tiers are som much different. The bottom tier had really rounded edge and the top one I managed to apply some new technique to get sharp edge (still work on progress to master the technique). I managed to get the sharp edge by the help of this tool, they call it side smoother by Little Venice Cake Company.


It's not cheap but sure is a good investment, one of the advantage being a traveling salesman is you could find things in unusual place, I found this little beauty at a craft store in Launceston, Tasmania.

Back to the cake, so I've done so many flowers and their really labor intensive and......only 2 roses made it on the cake. First because the cake turned out not so huge so the peonies will be to overpowering. Second, because Bakerz Mum like everything simple so the hydrangeas and buds are out of the picture. So without further a present you Bakerz Mum's birthday cake for 2012 (and it's her 30th).


So here's the contrast of Bakerz Mum's birthday party from last year and this year hehehehe. Almost the same concept but different technique and execution. Actually her cake last year was much smaller but got more flowers....hmmmm.


Some close up shot of the roses, so happy how it turned out

We had a great day on the prayer meeting and we had one of our best friend's mum sharing the same birthday with Bakerz Mum so we share the cake with her.

The birthday girls

Make a wish and blow the candle, look at me so excited and join in on blowing the candle

Family picture

We had a great day together, had some quality time as a family and sharing the love with a bunch of friends. At the end Bakerz Mum didn't get her dinner (poor thing) but we schedule the dinner the next day.

Thanks for checking my blog, will update you with my next project. It will be 2 tier cake with roses (sounds familiar) but this time it will be colorful.

Thursday 6 September 2012

Johnnie Walker Blue Label Cake


One of our daughter's carer in CC saw the photos of Alana's birthday party and praising the cake and all the sweets that we made. Before we know it she approached BakerzMum and asking us to make a cake for her partner's 30th birthday.

She picked Johnnie Walker Blue Label as the theme and we accepted the challenge. We've done 3D cake before and I think this project is not really difficult. However there some technique and material that we never used before and it makes the project more interesting.

One of the new material is modelling chocolate, which I've been dying to try. After watching so many episodes of Cake Boss I've been curios on this particular material. I found a simple recipe on the internet it turned out quite hard to work with and not as easy as fondant but I think people prefer eating chocolate rather than pure sugar so it was a god try. I used the modeling chocolate for the neck and cap of the bottle.

The other technique/material that we never use before is edible print. I've been wanting to try on edible print before but it's not cheap so I put it on hold. Receiving order less than week from delivery time makes finding printer for edible printing a challenge. I leave it up to BakerzMum to do the research and she found it not in the internet but in a place I never thought would do it. She went to the local cake shop that does edible print on cake and surprisingly their willing to do just the print without the cake and it's cheaper than the internet price and they can have it done in 2 days which is perfect. Applaud to BakerzMum and her 'think outside the square' thinking.

I begin with carving the cake and shaping the modeling chocolate and cove them with ganache. And then I cover the cake with dark chocolate fondant and the cap with beige color fondant which I painted god with gold lustre dusk, and I painted the chocolate fondant with pearl shimmer dusk.


The cake floating on top of Pyrex container

Once it all done I placed the cake on top of cake board and applying the edible prints and voila it transform from normal bottle cake into Johnnie Walker Blue Label cake.

Close up on the edible label

Secret message on the bottom label, I hope they notice it

Well honestly the edible prints come a little bit smaller than it suppose to. I've already instructed them not to scale the file but the obviously did but at least it's still looks good.

Another view

Another angle

This project is super fun and I'm doing it while seeping on aged whiskey hehehehe...just kidding. I wish Damo a very happy birthday and hopefully this cake marked one of his milestone. Thanks for checking guys.


Monday 3 September 2012

Puzzle Wedding Cake


I've known Angela and Simon not very long ago from a friend, actually I've known Angela first. I happened to know Simon when Angela ordered a birthday cake for his birthday, the panda cake back in February. Long story short they got engaged and was planning their wedding.

When Angela contacted me to do her wedding cake I was ecstatic because I've never done wedding cake before. She wanted a not so big wedding cake because they held their wedding reception in an buffet restaurant which come with dessert buffet, she said the cake will be for photo opt purpose.

The brief was to follow the invite design, on the invite they have a love heart puzzle with a message 'I've finally found the missing piece of puzzle of my heart' which I think really appropriate for this couple. She also wanted figurines of bride and groom holding one piece of puzzle from the love heart puzzle.

So I started planning the cake, I bought heart shape cake tin back in February planned to use it on Valentine's day but never happened so the cake tine made a debut with this project. Not really a master on making figurines but I try to improve every time I got a chance and I think these figurines are the best ones so far. Initially I wanted to have the figurines sending up but I decided to have them sitting down to make it easier to incorporate the missing puzzle. I also added a layer of cake underneath the heart shape cake solely so I have something for the figurines to sit on and have something to stick them on.

The figurines waiting to set on top of dummy polystyrene
Initially I wanted to cover the heart shaped cake with red fondant but the challenge of have to take one piece out made me to decide the love heart puzzle should sitting on top of the white fondant cover heart shaped cake so it's more like a true puzzle.

Love heart puzzle setting on top of the cake board

I've been working with ganache instead of butter cream for the last couple of project and I'm loving it so far. It's easier to make and to work with, the only down side is you can not make a mistake when you cover the cake with fondant as the chocolate will stain the fondant. I've developed new skills working with ganache but still need improvement.

Big love heart chocolate so appetizing

For the cake Angela asked me to do mocha cake, never done it before but we bake test some recipe and found a perfect one called Goldilock Mocha cake the best part of this recipe is the butter cream it contains Italian almond liquor called Ammareto...yummm yumm yummm.
another view of the cake

View from the top

I had so much fund doing this cake especially because I got to practice my ganaching technique which I think am getting better. I added pearl necklace on the bride to make it nicer and actually it was the only thing that matched the bride, she was wearing pearl necklace that day. 

The only thing is the dress of the figurine, when I made the figurine I had them sitting in the middle of the cake so I have the dress draping to the side but on the actual cake the bride was sitting on the edged hence the dress was hanging on the air but I don't really mind.


At the end I received a text message from Angela she said how happy she was with the cake and it's exactly how she wanted it. I'm so happy with her respond and it made all of the hard work paid off.

Thanks for checking my blog, will update you with my next project.


Saturday 1 September 2012

Little Red Riding Hood Party


Hi everyone,

I'm not going to post a cake this time, I mean not just a cake but a whole dessert table. We've come full circle with this project, as you may know that I started baking and cake decorating when I experimenting with fondant for my daughter's first birthday. I was making cookies-on-a stick back then, fast forward one year I did a whole dessert table for my daughter's second birthday. Here's a picture as a reminder when it all started.

Cookie-on-a stick I did for my daughter's first birthday

And now I present you, BakerzDad's first dessert table, it took months to plan, a week to execute and forever stays in my heart.


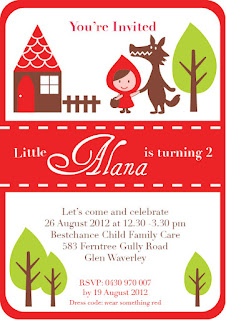
The theme was little red riding hood inspired by some beautiful creation by talented party stylist out there and the fact that red and pink is always my daughter's color. Initially I wanted to do Alice's tea party but at the end I decided to do little red because it's more suited for my daughter. So I went to the internet for some inspiration and I found the cutest rendition of little red by some Japanese lunch box company, so basically the picture that inspired me is taken from lunch boxes hehehehe. 

The invite

All of my cake decorating journey I've seen tons of beautiful dessert table and I promise myself one day that I will make my own dessert table. The opportunity came when we decided to throw  birthday party for my daughter and I was already planning months in advance especially what I did was trying to build cake stands collection.

I started with the printable, trained as desktop publisher sure came handy when I need to get some graphics done. I'm not the most creative person so what I did was basically using what I have from the invite design and make some printable out of it. This is the part that you need to plan ahead when you want to make sure no last minute rush. I got the printable printed and trimmed weeks before the party so I don't have to worry about it because it's quite time consuming to do.

The printable

For the desserts, I started a week in advance for the cookies as I can store them in airtight container and it won't go stale. The next step is macaroon shell, I tried 1.5 recipe in oppose to single recipe and my macaroons didn't turn out as I wanted but I can't be bothered to redo it. I store the shells in an airtight container and filled it one day before the party.


Cookies
my fat macaroons

I had my mum and dad came from overseas and I got my mum printed labels for apple juice bottles, I love how it turned out.


I did cupcakes and cakepops last once I finished with the cake. The turned out quite well too.

 Cupcakes

Cakepops

Let's take a closer look on the dessert table, I bought some lollies and marshmallows for the buffet and it added color to the table.
And now we move on to the cake, seeing a lot of dessert tables I can tell that since the table already loaded with sweets you don't need big cake and the design should simple as you already got a colorful table. But I can't resist myself, I've been dying to try on 3 tier cake and what's the best time to do it if not on my daughter's birthday. So BakerzMum and me decided to do 3 tier cake but I compensate with the design as I don't want it over crowded the table. I decided to once again took the graphic from the invite and playing with color.


Bottom layer is chocolate cake with ganache filling and I cover it with red fondant with minimum decoration.


The 2 top tiers are lapis surabaya with cut out fondant mimicking the invitation design.

This is a darn heavy cake but I'm really happy how it turned out and a great experience for me and BakerzMum.
We had a great day, as I finally got to do my first dessert table and everybody had fun at the party probably a little bit sugar overdose.
My little family

Thanks everyone for checking on my blog, hopefully I got to do project like this more often. Here's a sneak peek on photo session of the cake done with portable studio tent. I will update you with my next project.